
Make-Ahead Freezer Breakfast Sandwiches have become an essential recipe for busy families, students, and anyone seeking convenient yet nutritious morning options. As daily schedules get busier, there's a growing demand for recipes that not only save time but also provide quality nutrition.
The homemade Make-Ahead Freezer Breakfast Sandwiches offer just that—delicious, customizable, and incredibly convenient meals straight from your freezer to your plate. Inspired by the classic breakfast sandwich found in diners and cafes across the United States, this recipe is a modern twist designed for the fast-paced lifestyles of today.
Early breakfast sandwiches date back to the 19th century, first gaining popularity in the United States as quick, portable meals for workers and travelers. With the advent of food preservation methods, including freezing, the concept evolved into the make-ahead format.
Now families can prepare dozens at once, freeze them, and enjoy fresh-tasting, satisfying breakfasts any time. Prep value, nutrition, and flavor meet in one compact package with the make-ahead breakfast sandwich—a true weekday morning game-changer.
This article will walk you through the best methods, variations, and handy tips to create the perfect Make-Ahead Freezer Breakfast Sandwiches, enhancing your meal prep routine while keeping your mornings calm, efficient, and delicious.
Ingredients
- 12 large eggs
- ½ cup milk (any type)
- Salt and black pepper, to taste
- 12 English muffins, split
- 12 slices cooked bacon, breakfast sausage patties, or Canadian bacon
- 12 slices cheddar, Swiss, or your preferred cheese
- 2 tablespoons butter or cooking spray (for greasing pans)
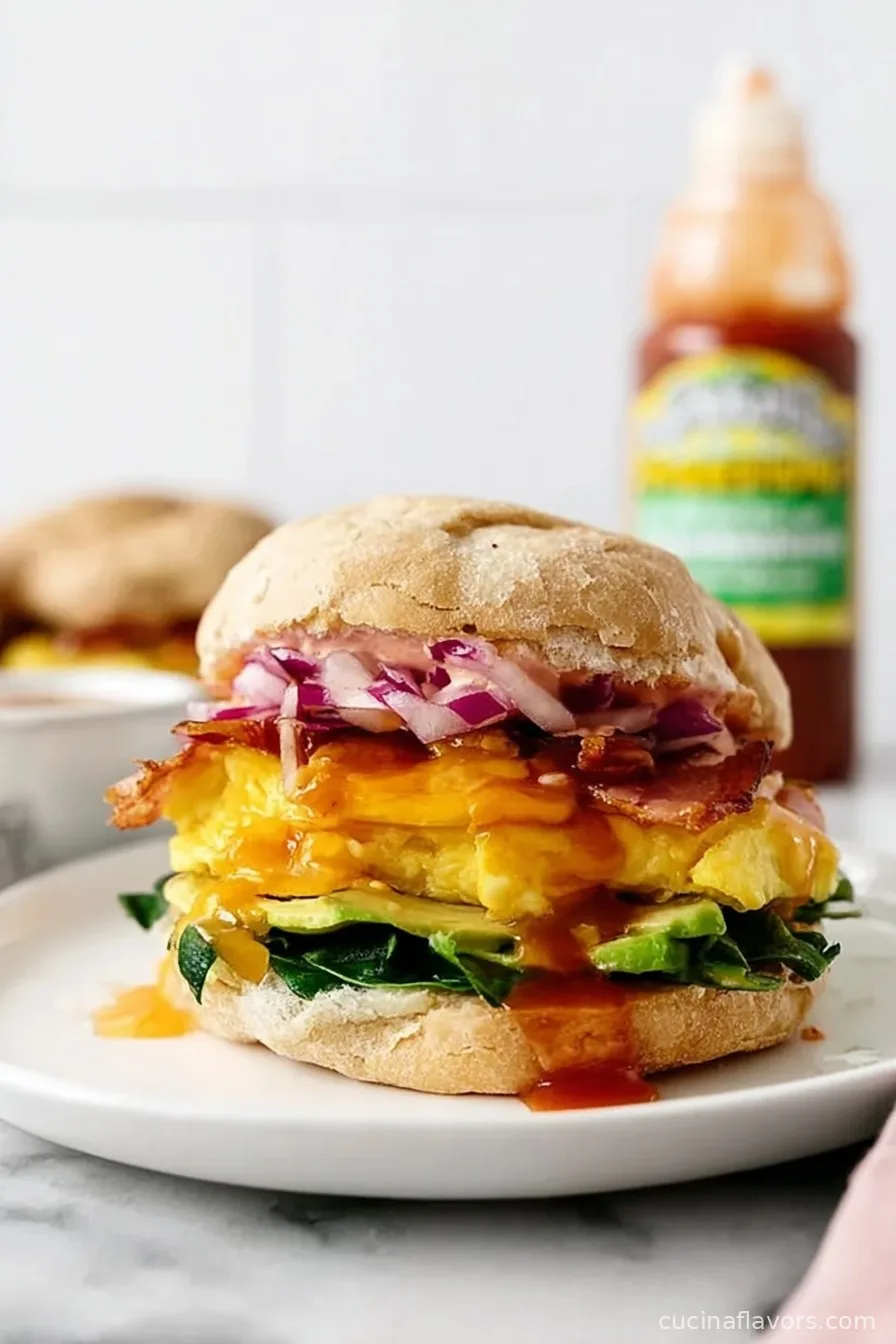
- Optional fillings: sautéed spinach, tomato slices, avocado, bell peppers, or hot sauce
Instructions
- Preheat your oven to 350°F (175°C) and lightly grease a 9x13-inch baking dish with butter or cooking spray.
- In a large bowl, whisk together the eggs, milk, salt, and black pepper until well combined.
- Pour the egg mixture into the prepared baking dish and bake for 18-22 minutes, or until set and slightly golden. Remove from the oven and let cool before cutting into 12 equal squares.
- While eggs bake, split English muffins and toast them in batches until golden. Let cool completely.
- Cook your chosen breakfast meat—bacon, sausage, or Canadian bacon—to your desired crispness. For lighter sandwiches, blot with paper towels to remove excess grease.
- To assemble, place one egg square onto the bottom half of each toasted muffin. Top with one slice of cheese and one portion of cooked meat. Add any optional fillings at this stage.
- Cover with the muffin tops and gently press each sandwich together.
- Wrap each sandwich tightly in parchment paper or foil, then place all wrapped sandwiches in a large freezer-safe zip-top bag or airtight container.
- Label and date bags, and freeze sandwiches for up to 2 months.
Nutritional Information
Make-Ahead Freezer Breakfast Sandwiches provide a balanced start to your day, combining protein, healthy fats, and carbohydrates to fuel long mornings.
One typical sandwich (using egg, a slice of cheddar, Canadian bacon, and a whole grain English muffin) contains around 350-400 calories, with 20-22g of protein, 15-18g of fat (depending on cheese and meat choices), and 28-30g of carbohydrates.
The eggs contribute high-quality protein and essential nutrients like vitamin D, B12, and choline. Choosing whole grain muffins adds fiber, supporting digestive health and helping you feel full. Customizing with vegetables like spinach, tomatoes, or peppers increases vitamin, mineral, and antioxidant intake, while swapping in lean proteins reduces saturated fat.
Sodium levels vary with processed meats and cheeses, but you can control this by selecting lower-sodium options. For gluten-free diets, opt for gluten-free muffins. Using low-fat cheese or skipping the cheese entirely can reduce calories and fat content.
Freezing preserves nutritional value, allowing you to enjoy a wholesome meal even on the busiest days, making these breakfast sandwiches an excellent choice for both convenience and nutrition.

Wine and Beverage Pairings
Make-Ahead Freezer Breakfast Sandwiches pair wonderfully with a range of beverages. For a classic breakfast feel, enjoy them with freshly brewed hot coffee or cold-brewed coffee for extra energy.
Tea lovers might prefer a robust black tea, such as English Breakfast or Earl Grey, which complements the savory flavors without overpowering them. If you're seeking a healthier option, a fresh green smoothie featuring spinach, banana, and almond milk balances the meal with additional vitamins and minerals.
For a weekend treat, a light mimosa made with citrus juice and bubbly can elevate brunch. No matter your preference, these sandwiches are versatile enough to enjoy with whatever morning drink best suits your taste and mood.
Cooking Tips and Variations
For best results, always cool all cooked components completely before assembling and freezing—this prevents freezer burn and sogginess. To add variety, swap in bagels, croissants, or gluten-free breads instead of English muffins. Vegetarians can substitute the meat with plant-based sausage or extra sautéed vegetables.
For extra flavor, spread a thin layer of pesto, mustard, or lightly salted butter on the muffin before assembly.
To reheat, remove parchment or foil, wrap in a damp paper towel, and microwave for 1-2 minutes until heated through, or bake in a preheated oven at 350°F (175°C) for 15 minutes. If making large batches, label each with cheese or meat type for quick identification.
Increase the healthy fats by adding a thin slice of avocado after reheating. For spicier sandwiches, add sliced jalapeños or a dash of hot sauce inside before freezing. Experiment with cheese varieties—Swiss, pepper jack, or provolone offer distinct flavors.
Avoid overfilling with moist vegetables, as they might affect sandwich texture when reheated. With these tips and adaptations, your Make-Ahead Freezer Breakfast Sandwiches will fit any dietary need and flavor preference.

Serving Suggestions
Serving Make-Ahead Freezer Breakfast Sandwiches could not be easier, whether you are rushing out the door or enjoying a leisurely brunch. On busy mornings, simply grab a sandwich from the freezer, reheat following the recommended method, and enjoy a hot, filling breakfast in minutes.
For a heartier meal, pair your sandwich with a side of fresh fruit—like orange wedges, berries, or apple slices—to add a refreshing note and more nutrients.
If serving a family or group, set up a breakfast sandwich bar, offering assorted toppings such as sliced tomatoes, baby spinach, sautéed mushrooms, or a selection of cheeses for personalization.
For entertaining, arrange the reheated sandwiches on a platter with an assortment of condiments—like hot sauce, salsa, or flavored spreads—so guests can customize their meal. If dining at home, serve with Greek yogurt and granola for extra protein and satiety.
These sandwiches are designed for flexibility: they're portable for school and work, yet impressive enough for weekend guests. For kids, cut sandwiches into halves or quarters and pair with a small smoothie or warm cocoa, making breakfast easy and enjoyable for all ages.
Health Benefits
Incorporating Make-Ahead Freezer Breakfast Sandwiches into your routine offers several health benefits. By controlling ingredients, you can choose whole-grain breads high in fiber for digestive health or opt for leaner proteins like turkey sausage or Canadian bacon to reduce saturated fat intake.
Eggs—central to these sandwiches—are naturally high in protein, essential amino acids, and nutrients such as choline, which supports brain health, and vitamin D for immunity. Adding vegetables like spinach or tomatoes increases antioxidants, vitamins, and minerals, boosting your daily intake for optimal well-being.
Preparing sandwiches at home lets you avoid excess sodium, preservatives, and additives often found in fast food or commercial frozen options. Furthermore, having a nutritious, protein-rich meal ready helps deter unhealthy grab-and-go choices, making it easier to stick to balanced eating habits even on busy mornings.
The flexibility to customize allows for adaptations for gluten-free, vegetarian, or lower-calorie lifestyles—ensuring nearly anyone can benefit from these satisfying and wholesome freezer breakfast sandwiches.
Frequently Asked Questions
Let all components—especially eggs and bread—cool completely before assembling. Wrapping each sandwich tightly in parchment or foil and freezing promptly reduces freeze-thaw moisture, helping them stay fresh and avoid sogginess when reheated.
Absolutely. Simply replace the meat with extra vegetables, plant-based sausage patties, or a slice of grilled tofu. You can still enjoy the same satisfying texture and flavors in a vegetarian-friendly way.
Properly wrapped and stored in an airtight freezer-safe bag or container, Make-Ahead Freezer Breakfast Sandwiches will keep for up to 2 months while retaining their best flavor and texture.
Remove the sandwich from any packaging, wrap in a damp paper towel, and microwave for 1-2 minutes or until heated through. Alternatively, bake in a 350°F (175°C) oven for about 15 minutes for a crisp finish.
Yes, you can use bagels, croissants, sandwich thins, or gluten-free bread to tailor the sandwiches to your tastes or dietary needs. Just ensure your chosen bread freezes and reheats well.
Make-Ahead Freezer Breakfast Sandwiches are the answer to busy mornings, providing a wholesome, delicious, and fully customizable breakfast that’s ready in minutes. With minimal effort, you can stock your freezer with satisfying options tailored to your family’s tastes and dietary needs. Not only do they save time, but they also allow for healthier ingredient choices over store-bought or fast food options. Whether preparing for hectic weekdays, leisurely weekends, or special occasions, these freezer-friendly sandwiches will keep you fueled, satisfied, and energized throughout the day. Start meal prepping today and experience just how easy a great breakfast can be with Make-Ahead Freezer Breakfast Sandwiches.
Ingredients
- 12 large eggs
- ½ cup milk (any type)
- Salt and black pepper, to taste
- 12 English muffins, split
- 12 slices cooked bacon, breakfast sausage patties, or Canadian bacon
- 12 slices cheddar, Swiss, or your preferred cheese
- 2 tablespoons butter or cooking spray (for greasing pans)
- Optional fillings: sautéed spinach, tomato slices, avocado, bell peppers, or hot sauce
Instructions
-
1Preheat your oven to 350°F (175°C) and lightly grease a 9x13-inch baking dish with butter or cooking spray.
-
2In a large bowl, whisk together the eggs, milk, salt, and black pepper until well combined.
-
3Pour the egg mixture into the prepared baking dish and bake for 18-22 minutes, or until set and slightly golden. Remove from the oven and let cool before cutting into 12 equal squares.
-
4While eggs bake, split English muffins and toast them in batches until golden. Let cool completely.
-
5Cook your chosen breakfast meat—bacon, sausage, or Canadian bacon—to your desired crispness. For lighter sandwiches, blot with paper towels to remove excess grease.
-
6To assemble, place one egg square onto the bottom half of each toasted muffin. Top with one slice of cheese and one portion of cooked meat. Add any optional fillings at this stage.
-
7Cover with the muffin tops and gently press each sandwich together.
-
8Wrap each sandwich tightly in parchment paper or foil, then place all wrapped sandwiches in a large freezer-safe zip-top bag or airtight container.
-
9Label and date bags, and freeze sandwiches for up to 2 months.
Approximate Information for One Serving
Nutrition Disclaimers
Number of total servings shown is approximate. Actual number of servings will depend on your preferred portion sizes.
Nutritional values shown are general guidelines and reflect information for 1 serving using the ingredients listed, not including any optional ingredients. Actual macros may vary slightly depending on specific brands and types of ingredients used.
To determine the weight of one serving, prepare the recipe as instructed. Weigh the finished recipe, then divide the weight of the finished recipe (not including the weight of the container the food is in) by the desired number of servings. Result will be the weight of one serving.
Did you make this recipe?
Please consider Pinning it!

Leave a Reply