
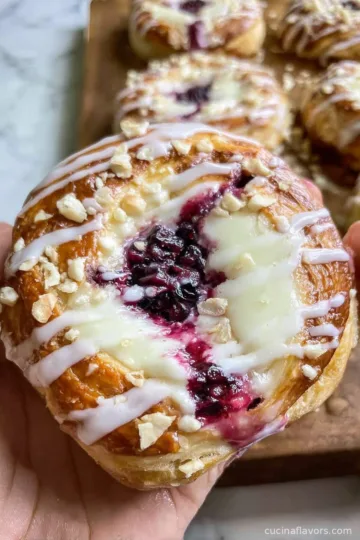
Introducing the irresistible Blueberry Cheesecake Brioche Buns—a delightful fusion of pillowy soft brioche dough, luscious cheesecake filling, and vibrant blueberry preserves. This recipe seamlessly combines classic French baking finesse with the comforting flavors of New York-style cheesecake, all in a hand-held pastry perfect for breakfast, brunch, or dessert.
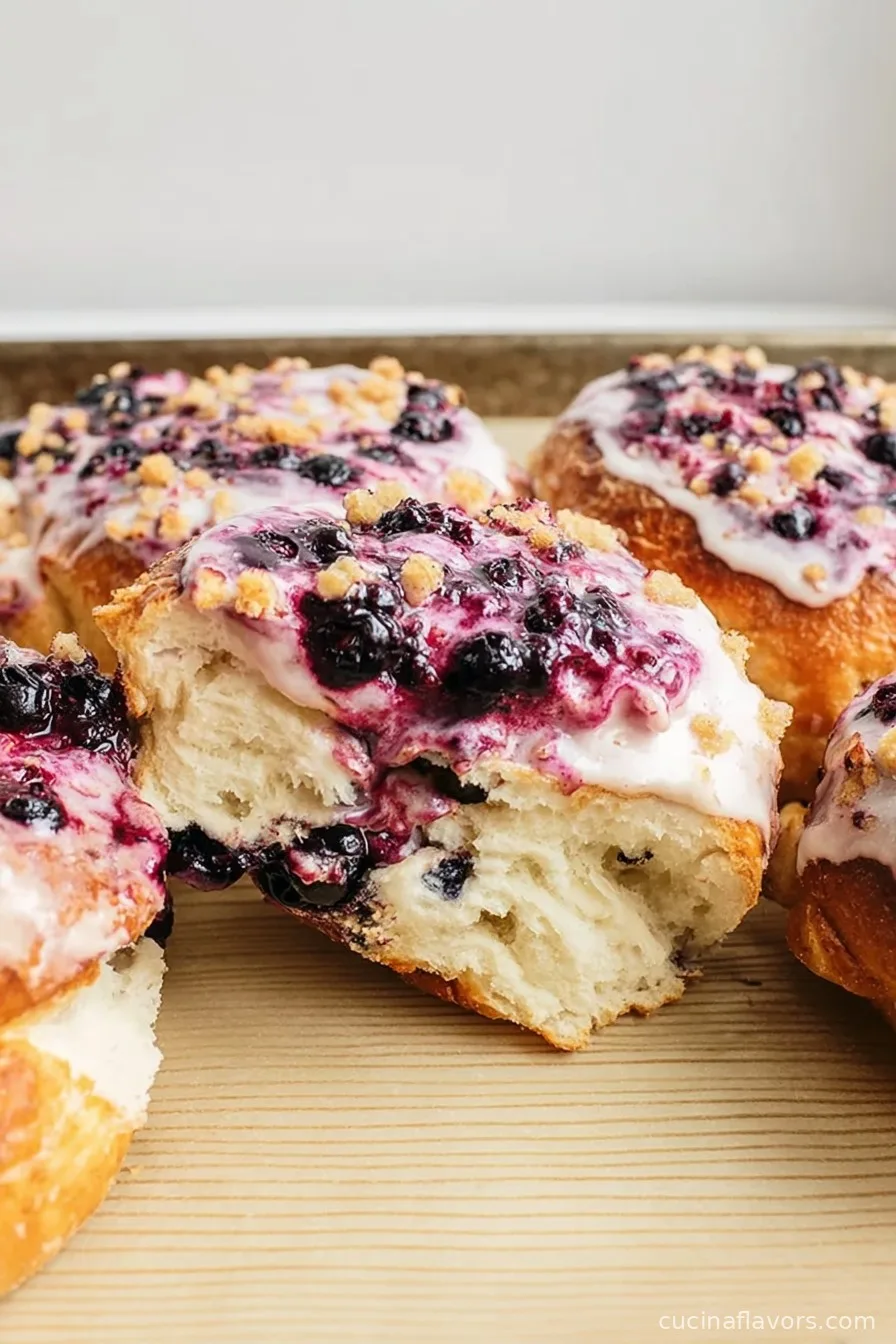
Brioche, renowned for its rich and tender crumb thanks to butter and eggs, provides a luxurious base, while the creamy tang of cream cheese balances the sweet fruitiness of blueberry preserves.
These Blueberry Cheesecake Brioche Buns harken back to the popular pastry cultures of both France and America, bringing together buttery bread and rich cream cheese in a truly creative way. These buns are not only a treat for your taste buds but also a showstopper for any gathering.
Whether you grew up loving blueberry muffins or relishing cheesecake at family gatherings, these buns are bound to evoke nostalgia while offering a modern twist.
Be it for a celebratory brunch, a sweet snack, or a luxurious breakfast, this versatile bake taps into a tradition of sweet buns found across cultures, making it a worthy addition to your baking repertoire.
Prepare for intoxicating aromas and irresistible flavors as we guide you through this comprehensive, step-by-step recipe for Blueberry Cheesecake Brioche Buns.
Ingredients
- ¾ cup water
- 1 cup milk
- 2 tablespoons sugar
- 2 tablespoons honey
- 5 tablespoons butter
- 2 ¼ teaspoons active dry yeast (1 packet)
- 4 to 4 ½ cups all-purpose flour
- 2 ½ teaspoons salt
- 8 ounces cream cheese, at room temperature
- ⅓ cup sugar
- 1 teaspoon vanilla extract
- ⅓ cup blueberry preserves
- 3 tablespoons sugar
- 3 tablespoons brown sugar
- 1 tablespoon cornstarch
- ½ teaspoon cinnamon
- ¼ teaspoon salt
- ¾ cup all-purpose flour
- 4 tablespoons butter
Instructions
- Begin by combining water, milk, sugar, honey, and one tablespoon of butter in a microwave-safe bowl. Heat the mixture in the microwave until it reaches a temperature between 110°F and 115°F, using an instant-read thermometer to accurately check. This temperature range is ideal for activating yeast, ensuring successful rising of your dough.
- Once warmed, sprinkle the active dry yeast over the liquid mixture. Stir gently and set aside for about five minutes. During this time, the mixture should turn foamy and bubbly—clear signs that the yeast is active and ready to work its magic.
- Next, transfer the yeast mixture to the bowl of a stand mixer. Add the remaining butter and stir until well combined, though at this stage the mixture may still appear a bit lumpy. Add in 4 cups of flour and the salt, then start kneading the dough. Gradually add the flour until a smooth dough begins to form.
- Continue kneading, using the mixer’s dough hook attachment or by hand, until the dough becomes elastic and starts to pull away from the sides of the bowl. If the dough is excessively sticky, add a little more flour, one tablespoon at a time. The dough should remain soft and just slightly tacky when touched.
- Carry on kneading for about 5 minutes if you’re using a stand mixer, or about 10 minutes if kneading by hand. You’re aiming for an elastic texture that bounces back lightly when pressed with your finger, ensuring your buns will be wonderfully airy after baking.
- Coat a large bowl with a thin layer of oil and transfer your kneaded dough to it. Cover the bowl tightly with plastic wrap to prevent drying. Allow the dough to rise in a warm place until it has increased by about one-third in volume. This initial proofing should take roughly 30 minutes, but keep an eye on the dough—using your phone to snap a quick before-and-after photo is a helpful trick to track its progress.
- While the dough is rising, line a sizeable baking sheet with parchment paper to ensure your baked buns won’t stick and to facilitate easy cleanup later.
- Once the dough has finished its first rise, gently deflate it and divide into 8 equal portions. Shape each portion into a smooth ball by drawing the edges under and pinching the seams closed. Using an unfloured work surface can help create just the right surface tension to keep your buns round and neat.
- Arrange the dough balls evenly spaced on your prepared baking sheet. Cover them loosely with a clean towel or plastic wrap and allow them to rest for another 20 minutes. This final rest lets the dough relax and settle, leading to fluffier buns once baked. Meanwhile, preheat your oven to 375°F (190°C) so it's ready when you are.
Nutritional Information
Blueberry Cheesecake Brioche Buns offer a balanced mix of macronutrients and energy, perfect for a special breakfast or dessert treat. Each bun provides a moderate carbohydrate boost from the flour and sugars, making it a satisfying option to fuel your morning or offer a midday pick-me-up.
The use of butter and cream cheese imparts a comforting richness, supplying healthy fats that promote satiety and a creamy texture. With 8 ounces of cream cheese split among eight buns, the protein and calcium content also receive a welcome contribution, supporting bone health and muscle maintenance.
Blueberry preserves lend antioxidants, vitamins, and natural fruit sugars, while the absence of artificial additives lets you indulge with confidence. Each serving is estimated to contain approximately 350-400 calories, 14-18 grams of fat, 6-8 grams of protein, and 45-50 grams of carbohydrates.
The cinnamon and honey provide trace minerals and anti-inflammatory benefits, while the blended sugars offer a balance between flavor and texture in both the dough and crumble. For those monitoring their dietary intake, these buns can be enjoyed in moderation as part of a wholesome, balanced diet.
Feel free to pair your serving with fresh fruit or a side of yogurt for a more rounded meal.
Wine and Beverage Pairings
These Blueberry Cheesecake Brioche Buns pair beautifully with a hot cup of coffee or a rich, creamy latte, complementing their buttery, sweet flavors.
For tea lovers, a pot of Earl Grey or breakfast tea brings out the floral notes of the blueberry preserves, while a lightly sweetened herbal tea, such as chamomile or hibiscus, provides a refreshing counterbalance.
If you are serving these buns as a dessert after dinner, consider offering a glass of chilled Moscato or a sparkling white wine. For those who prefer non-alcoholic beverages, a glass of fresh cold milk or a blueberry smoothie reinforces the fruity flavors and makes for a wholesome treat.
Cooking Tips and Variations
Baking Blueberry Cheesecake Brioche Buns to perfection is all about technique and a few simple tricks. Firstly, ensure your yeast is fresh and that your milk-water mixture is neither too hot nor too cold, as extreme temperatures can hinder yeast activity or even deactivate it.
For an extra-light texture, let your dough rise in a warm, draft-free area, such as inside your oven with just the light on. When shaping the buns, be careful to seal any seams on the bottom to preserve that classic fluffy, round shape.
If you want a more intense blueberry flavor, try swirling a little extra blueberry preserves into the filling before sealing the buns. For a crunchier top, make sure your crumble topping is well-blended and sprinkled on just before baking to prevent it from melting into the dough.
Variations for these buns are plentiful—experiment with raspberry or strawberry preserves, or even add a few fresh berries if you have some on hand. For a richer filling, consider blending in a touch of lemon zest or a splash of almond extract.
If you prefer smaller buns, divide the dough into 12 pieces and reduce the baking time slightly, keeping a close eye on color and doneness.

Serving Suggestions
Serving Blueberry Cheesecake Brioche Buns is a simple pleasure that can be dressed up or down for any occasion. Present the buns warm from the oven, allowing family or guests to enjoy the aromatic melt of creamy cheesecake against soft brioche and sweet berry preserves.
For a brunch spread, place the buns on a wooden platter, accompanied by a small dish of extra blueberry preserves or a dollop of whipped cream. These buns also make a standout addition to afternoon tea, paired with fresh berries and a sprinkling of powdered sugar for an elegant touch.
If serving for dessert, try slicing the buns in half and filling with a bit more cream cheese or even a spoonful of lemon curd to boost the cheesecake essence. At breakfast, complete the meal with Greek yogurt and a fresh fruit salad to keep things light yet satisfying.
For festive gatherings, arrange the buns in a decorative basket lined with a linen napkin to keep them warm and inviting. Regardless of the approach, these Blueberry Cheesecake Brioche Buns are certain to impress, offering both visual appeal and exceptional flavor.
Health Benefits
Enjoyed in moderation, Blueberry Cheesecake Brioche Buns can be a part of a balanced and enjoyable diet. Blueberries are well-known for their antioxidant properties, contributing vitamins such as vitamin C and K, while also supporting heart and cognitive health.
The cream cheese filling offers both protein and calcium, aiding in bone strength and overall wellness.
Though the buns contain butter and sugar, these ingredients are essential for creating the unique, tender texture and irresistible flavor; for those looking to enhance the health profile, consider substituting part of the all-purpose flour with whole wheat flour for added fiber.
Using honey in the dough not only contributes to flavor but also provides trace minerals and has a lower glycemic impact compared to refined sugar.
If desired, you can reduce the amount of sugar in the filling or crumble, or experiment with lower-fat cream cheese options without sacrificing taste or texture.
With their combination of nutrients from both dairy and fruit, Blueberry Cheesecake Brioche Buns are a wholesome treat when incorporated sensibly into your meal plan.
Frequently Asked Questions
Absolutely. You can prepare the dough and shape the buns a day ahead. Simply cover and refrigerate them overnight for a slow rise, allowing you to bake fresh buns in the morning. Let them come to room temperature before adding the filling and crumble, then bake as instructed.
If blueberry preserves are unavailable, you can substitute with other fruit preserves such as raspberry or strawberry. You may also use fresh blueberries tossed with a small amount of sugar and cornstarch if desired.
Yes, these buns freeze wonderfully. Let them cool completely, wrap individually, and store in an airtight container or freezer bag for up to 2 months. Thaw overnight at room temperature or reheat gently in the oven before serving.
Make sure the liquid ingredients are not hotter than 115°F to avoid killing the yeast. Use fresh yeast, and let the dough rise in a warm, draft-free area. Rising time may vary depending on room temperature.
Certainly. You can knead the dough entirely by hand. It will take a bit more time and effort, but the results will be just as delicious. Make sure to knead until the dough is smooth and elastic.
Blueberry Cheesecake Brioche Buns represent the ultimate indulgent fusion of creamy, fruity, and buttery flavors, making them a show-stopping choice for breakfast, brunch, or dessert. These buns are remarkable for both their taste and their elegant appearance. Whether you’re treating yourself on a quiet morning, serving guests at a festive brunch, or introducing your family to a new homemade classic, this recipe will become a beloved favorite for years to come. With practical tips, serving suggestions, and ideas for making the recipe your own, you’re ready to embark on a delicious baking journey. Enjoy the process—and most of all, savor every soft, sweet bite of these unforgettable Blueberry Cheesecake Brioche Buns.
Ingredients
- ¾ cup water
- 1 cup milk
- 2 tablespoons sugar
- 2 tablespoons honey
- 5 tablespoons butter
- 2 ¼ teaspoons active dry yeast (1 packet)
- 4 to 4 ½ cups all-purpose flour
- 2 ½ teaspoons salt
- 8 ounces cream cheese, at room temperature
- ⅓ cup sugar
- 1 teaspoon vanilla extract
- ⅓ cup blueberry preserves
- 3 tablespoons sugar
- 3 tablespoons brown sugar
- 1 tablespoon cornstarch
- ½ teaspoon cinnamon
- ¼ teaspoon salt
- ¾ cup all-purpose flour
- 4 tablespoons butter
Instructions
-
1Begin by combining water, milk, sugar, honey, and one tablespoon of butter in a microwave-safe bowl. Heat the mixture in the microwave until it reaches a temperature between 110°F and 115°F, using an instant-read thermometer to accurately check. This temperature range is ideal for activating yeast, ensuring successful rising of your dough.
-
2Once warmed, sprinkle the active dry yeast over the liquid mixture. Stir gently and set aside for about five minutes. During this time, the mixture should turn foamy and bubbly—clear signs that the yeast is active and ready to work its magic.
-
3Next, transfer the yeast mixture to the bowl of a stand mixer. Add the remaining butter and stir until well combined, though at this stage the mixture may still appear a bit lumpy. Add in 4 cups of flour and the salt, then start kneading the dough. Gradually add the flour until a smooth dough begins to form.
-
4Continue kneading, using the mixer’s dough hook attachment or by hand, until the dough becomes elastic and starts to pull away from the sides of the bowl. If the dough is excessively sticky, add a little more flour, one tablespoon at a time. The dough should remain soft and just slightly tacky when touched.
-
5Carry on kneading for about 5 minutes if you’re using a stand mixer, or about 10 minutes if kneading by hand. You’re aiming for an elastic texture that bounces back lightly when pressed with your finger, ensuring your buns will be wonderfully airy after baking.
-
6Coat a large bowl with a thin layer of oil and transfer your kneaded dough to it. Cover the bowl tightly with plastic wrap to prevent drying. Allow the dough to rise in a warm place until it has increased by about one-third in volume. This initial proofing should take roughly 30 minutes, but keep an eye on the dough—using your phone to snap a quick before-and-after photo is a helpful trick to track its progress.
-
7While the dough is rising, line a sizeable baking sheet with parchment paper to ensure your baked buns won’t stick and to facilitate easy cleanup later.
-
8Once the dough has finished its first rise, gently deflate it and divide into 8 equal portions. Shape each portion into a smooth ball by drawing the edges under and pinching the seams closed. Using an unfloured work surface can help create just the right surface tension to keep your buns round and neat.
-
9Arrange the dough balls evenly spaced on your prepared baking sheet. Cover them loosely with a clean towel or plastic wrap and allow them to rest for another 20 minutes. This final rest lets the dough relax and settle, leading to fluffier buns once baked. Meanwhile, preheat your oven to 375°F (190°C) so it's ready when you are.
Approximate Information for One Serving
Nutrition Disclaimers
Number of total servings shown is approximate. Actual number of servings will depend on your preferred portion sizes.
Nutritional values shown are general guidelines and reflect information for 1 serving using the ingredients listed, not including any optional ingredients. Actual macros may vary slightly depending on specific brands and types of ingredients used.
To determine the weight of one serving, prepare the recipe as instructed. Weigh the finished recipe, then divide the weight of the finished recipe (not including the weight of the container the food is in) by the desired number of servings. Result will be the weight of one serving.
Did you make this recipe?
Please consider Pinning it!

Leave a Reply