
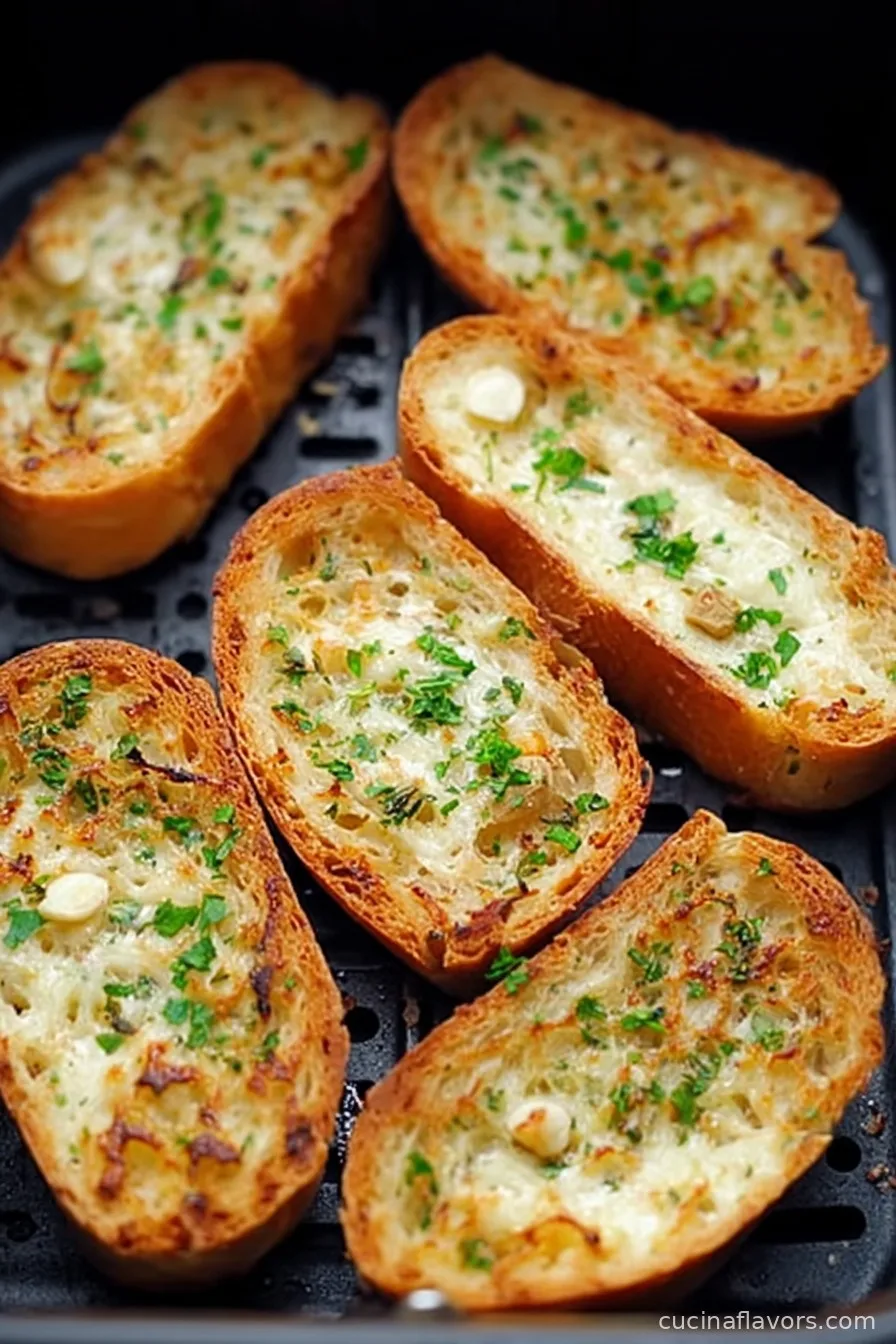
If you're a fan of warm, buttery, and perfectly crispy garlic bread, you'll love this Homemade Air Fryer Garlic Bread recipe. Garlic bread is a universally beloved side dish that has graced dinner tables across the globe for decades.
Its rich history traces back to Italian cuisine, specifically the tradition of rubbing garlic onto toasted bread and drizzling it with olive oil or butter. Over the years, garlic bread has evolved, with various cultures adding their twists, making it a staple in everything from Italian-American restaurants to home kitchens.
In this modern twist, we harness the power of the air fryer to make the garlic bread experience even more convenient while enhancing its irresistible texture.
The air fryer slashes cooking time, delivers an enviably crisp crust, and uses less oil than traditional oven baking, making this version slightly healthier without compromising on flavor. The result is a crunchy, golden-brown exterior and an aromatic, buttery, garlicky center that melts in your mouth.
Whether you're serving Homemade Air Fryer Garlic Bread as an appetizer at your next get-together, a side for pasta night, or as a quick snack, this recipe brings intense flavor and mouthwatering aromas to your home.
The simple preparation and minimal ingredients mean you can whip it up anytime a carb craving strikes or when you want to impress family and friends with a homemade touch.
Get ready to enjoy the best of both worlds: classic garlic bread flavor and the convenience of air frying in one unforgettable bite.
Ingredients
- 1 French baguette or Italian bread loaf
- ½ cup unsalted butter, softened
- 4 garlic cloves, minced
- 2 tablespoons fresh parsley, chopped (optional)
- ½ teaspoon salt
- ¼ teaspoon black pepper
- ⅓ cup grated Parmesan cheese (optional)
- 1 tablespoon olive oil (optional for extra crispness)
Instructions
- Preheat your air fryer to 350°F (175°C) for 3-5 minutes to ensure even cooking.
- Slice the baguette or Italian bread loaf into pieces about 1 inch thick, cutting on a bias for more surface area.
- In a small bowl, mix the softened unsalted butter with minced garlic, chopped parsley, salt, and black pepper until well combined. If desired, add the olive oil for extra crispiness.
- Spread a generous layer of the garlic butter mixture onto each slice of bread, ensuring the surface is evenly coated to maximize flavor.
- Sprinkle each slice with grated Parmesan cheese if desired, for an indulgent, savory touch.
- Arrange the bread slices in a single layer in the air fryer basket, making sure they do not overlap for optimal airflow and crispiness. You may need to work in batches depending on the size of your air fryer.
- Air fry the garlic bread slices for 4-6 minutes or until the tops are golden brown and crispy. Check after 4 minutes to prevent over-browning.
- Remove the slices carefully and let them cool for 1-2 minutes before serving. Enjoy warm as a side or appetizer.
Nutritional Information
Homemade Air Fryer Garlic Bread is a delicious treat that can fit into a balanced diet when enjoyed in moderation. Each slice, depending on the size and added toppings, provides roughly 120-150 calories, with most calories coming from carbohydrates and healthy fats.
The bread offers a good amount of energy, making it a great pairing with high-protein main dishes like grilled chicken or stews. The use of fresh garlic not only adds flavor but also brings antioxidants and compounds like allicin, which may support heart health and immune function.
Choosing unsalted butter allows for better sodium control, especially when paired with Parmesan cheese, which is higher in salt content. You can further boost the nutritional value by opting for whole-grain bread, which provides additional fiber and micronutrients.
If you add cheese, also consider its contribution to calcium and protein but be mindful as it increases saturated fat content.
The air frying method reduces the need for excess oil, resulting in a slightly lower fat content compared to traditional pan-frying or baking with large amounts of butter or oil.
Whether you’re monitoring your calorie intake or focusing on heart health, making garlic bread at home ensures you control every ingredient for a healthier, more wholesome slice. Always remember to balance your meal with plenty of vegetables for a nutrient-rich plate.
Wine and Beverage Pairings
Homemade Air Fryer Garlic Bread pairs beautifully with a variety of beverages. If you’re enjoying it with a classic Italian meal, consider a light-bodied white wine such as Pinot Grigio or Sauvignon Blanc—their crisp acidity complements the richness of the garlic butter and cheese.
For red wine lovers, a Chianti or Pinot Noir also balances the savory, garlicky notes without overwhelming the palate. If you prefer non-alcoholic options, try sparkling water with a slice of lemon or a chilled herbal tea.
For a cozy comfort meal, a warm mug of tomato soup or a frothy cappuccino provides a soothing contrast to the garlic bread’s crunch.
Cooking Tips and Variations
Achieving the perfect Homemade Air Fryer Garlic Bread relies not only on a well-executed recipe but also on a few key tricks and possible customizations. Firstly, always preheat your air fryer; this ensures the garlic bread cooks evenly and achieves a consistent golden-brown crust.
For the ideal texture, select a day-old or slightly stale loaf, as this will crisp up better than very fresh bread, which can become soggy. If you love intense flavor, increase the number of garlic cloves or add a pinch of garlic powder to the butter mixture.
For herbaceous notes, experiment with other fresh herbs like basil, rosemary, or chives alongside the parsley. For a spicy kick, sprinkle red pepper flakes over the buttered bread before cooking. Dairy-free? You can easily swap in vegan butter and skip the cheese or use a plant-based parmesan.
Whole wheat or gluten-free breads both work as excellent bases if you have dietary restrictions. If preparing garlic bread for a crowd, assemble the slices ahead of time and refrigerate up to a day in advance, then air fry just before serving for ultimate freshness.
Should you prefer a softer, pull-apart center, lightly cover the bread with foil during the last minute of air frying to trap moisture. Reheat any leftovers in the air fryer for 1–2 minutes to restore the original crispiness.
These small adjustments guarantee Homemade Air Fryer Garlic Bread that matches your taste and dietary needs every time.

Serving Suggestions
When it comes to serving Homemade Air Fryer Garlic Bread, presentation and complementary dishes are key to elevating the experience. For family meals, arrange the garlic bread slices in a basket lined with a crisp kitchen towel or napkin to keep them warm at the table.
If you're entertaining guests, serve the bread on a rustic wooden board, garnished with extra chopped herbs, and accompany it with small bowls of marinara or olive tapenade for dipping.
Garlic bread shines as a side to hearty pasta dishes like spaghetti bolognese, lasagna, or fettuccine alfredo, soaking up rich, flavorful sauces. It's equally delicious alongside soups, especially creamy tomato or vegetable soups, where it acts as the perfect vessel for dipping.
For a lighter option, pair your garlic bread with crisp, green salads topped with vinaigrette to cut through the richness of the butter and cheese. Leftover slices can be transformed into gourmet croutons for salads or ground into breadcrumbs for your next dish.
For a brunch twist, top a warm slice with scrambled eggs or avocado mash. Whether served as an appetizer, snack, or part of the main meal, Homemade Air Fryer Garlic Bread offers a versatile, crowd-pleasing option for any occasion.
Ensure you serve while it's fresh and hot, allowing everyone to enjoy the delightful crunch and fragrant aroma that make this dish so special.
Health Benefits
Homemade Air Fryer Garlic Bread offers several health benefits, especially when you control the ingredients in your kitchen. Using fresh garlic isn't just for flavor; it contains allicin, a compound known for its immune-supporting, anti-inflammatory, and potential heart-protective properties.
By opting for an air fryer instead of pan-frying or oven baking with lots of oil, you significantly reduce the overall fat content without losing out on a satisfying crunch. Choosing unsalted butter or high-quality olive oil allows for better control of sodium and saturated fat, supporting heart health.
Substituting a whole-grain bread base adds fiber, which benefits digestion and helps keep you feeling fuller for longer. With minimal additives or preservatives, homemade options are generally cleaner than most store-bought garlic breads. Adding fresh herbs like parsley also provides a boost of vitamin K, antioxidants, and more micronutrients.
While cheese adds calcium and protein, moderation keeps the dish balanced. Whether you're adapting this recipe for special diets or just seeking a homemade, more nourishing alternative, this version of garlic bread fits well into a variety of healthy eating plans.
Frequently Asked Questions
Yes, pre-sliced bread can be used for convenience. Just ensure the slices are thick enough to hold the garlic butter without becoming too crispy or brittle during air frying.
Allow the garlic bread to cool completely, then store in an airtight container at room temperature for up to 2 days. Reheat in the air fryer for 1-2 minutes for best results.
Absolutely! Substitute vegan butter for dairy butter, and use dairy-free cheese or omit the cheese entirely for a delicious plant-based option.
Yes, the garlic butter can be prepared up to two days in advance and stored in the refrigerator. Allow it to soften before spreading onto the bread slices for easier application.
Cooking time and temperature are key. Too soft may mean undercooking or overcrowding. Too hard means overcooking. Adjust by checking doneness frequently and avoiding overlapping slices in the basket.
Homemade Air Fryer Garlic Bread is an easy and versatile addition to any menu, offering maximum flavor with minimal effort. Its irresistible aroma, crunchy texture, and the ability to customize it for dietary needs make it a staple recipe worth returning to again and again. With just a handful of ingredients and a short cooking time, you can enjoy golden-brown garlic bread that’s healthier than many store-bought options and as satisfying as traditional restaurant fare. Whether paired with pasta, salad, soups, or enjoyed as a snack, this recipe brings the warmth of homemade cooking to your table in under 10 minutes. Try out different variations, share it with loved ones, and make it your go-to side for memorable meals. Homemade Air Fryer Garlic Bread—easy, quick, and delicious every time.
Ingredients
- 1 French baguette or Italian bread loaf
- ½ cup unsalted butter, softened
- 4 garlic cloves, minced
- 2 tablespoons fresh parsley, chopped (optional)
- ½ teaspoon salt
- ¼ teaspoon black pepper
- ⅓ cup grated Parmesan cheese (optional)
- 1 tablespoon olive oil (optional for extra crispness)
Instructions
-
1Preheat your air fryer to 350°F (175°C) for 3-5 minutes to ensure even cooking.
-
2Slice the baguette or Italian bread loaf into pieces about 1 inch thick, cutting on a bias for more surface area.
-
3In a small bowl, mix the softened unsalted butter with minced garlic, chopped parsley, salt, and black pepper until well combined. If desired, add the olive oil for extra crispiness.
-
4Spread a generous layer of the garlic butter mixture onto each slice of bread, ensuring the surface is evenly coated to maximize flavor.
-
5Sprinkle each slice with grated Parmesan cheese if desired, for an indulgent, savory touch.
-
6Arrange the bread slices in a single layer in the air fryer basket, making sure they do not overlap for optimal airflow and crispiness. You may need to work in batches depending on the size of your air fryer.
-
7Air fry the garlic bread slices for 4-6 minutes or until the tops are golden brown and crispy. Check after 4 minutes to prevent over-browning.
-
8Remove the slices carefully and let them cool for 1-2 minutes before serving. Enjoy warm as a side or appetizer.
Approximate Information for One Serving
Nutrition Disclaimers
Number of total servings shown is approximate. Actual number of servings will depend on your preferred portion sizes.
Nutritional values shown are general guidelines and reflect information for 1 serving using the ingredients listed, not including any optional ingredients. Actual macros may vary slightly depending on specific brands and types of ingredients used.
To determine the weight of one serving, prepare the recipe as instructed. Weigh the finished recipe, then divide the weight of the finished recipe (not including the weight of the container the food is in) by the desired number of servings. Result will be the weight of one serving.
Did you make this recipe?
Please consider Pinning it!

Leave a Reply