
Bisquick Sausage Balls have become a beloved classic in kitchens across America, shining at potlucks, holiday gatherings, and casual parties. Full of comforting flavors and requiring only a handful of pantry staples, Bisquick Sausage Balls deliver a satisfying, savory bite that is hard to resist.
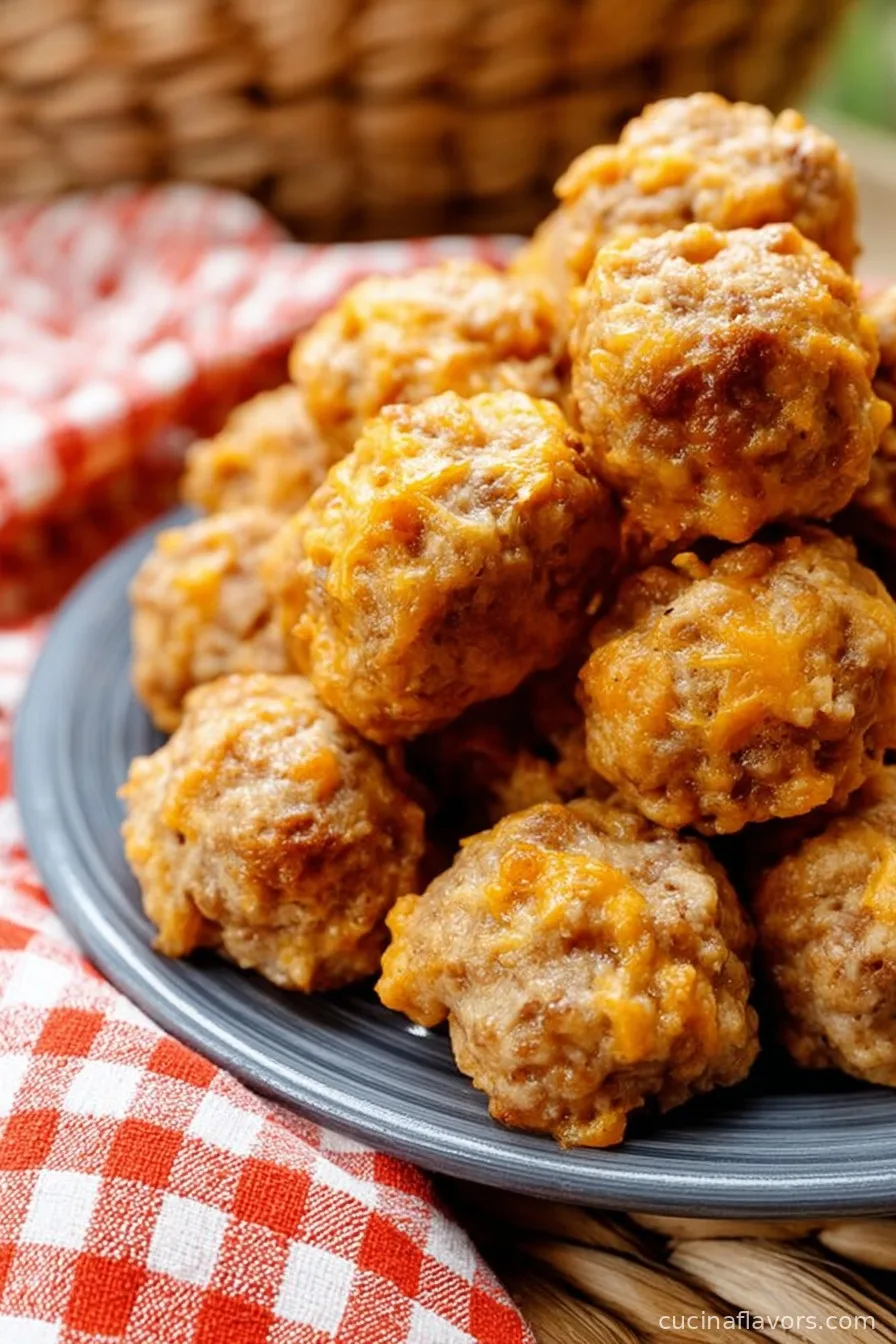
The key elements—savory sausage, sharp cheddar, and the ever-versatile Bisquick baking mix—blend seamlessly for a tender, cheesy, and filling snack. This easy appetizer traces its roots to Southern traditions, where simple ingredients and bold flavors are highly valued.
Bisquick, an all-purpose baking mix introduced in the 1930s, made homemade baking accessible and quick. Pairing it with sausage and cheese to create these crowd-pleasing sausage balls was a stroke of genius that families have cherished for decades.
Not only are these sausage balls a star appetizer, but they also make an excellent breakfast on the go, a delectable snack, or an addition to brunch spreads.
The unbeatable combination of a crisp exterior and a soft, flavorful interior has earned Bisquick Sausage Balls their place as a go-to recipe for cooks of every skill level.
Whether you're looking for finger food for game days, holiday festivities, or a hearty snack to please your family, this Bisquick Sausage Balls recipe is sure to deliver every time.
With a preparation time of just minutes and a handful of steps, they are as easy to make as they are delicious. Read on to explore the full recipe, discover expert tips, and learn how to serve prefect Bisquick Sausage Balls at your next gathering.
Ingredients
- 2 cups Bisquick baking mix
- 1 pound uncooked ground pork sausage (mild or spicy)
- 1 ½ cups shredded sharp cheddar cheese
- ¼ cup milk
- ½ teaspoon garlic powder (optional)
- ½ teaspoon onion powder (optional)
- ¼ teaspoon black pepper
- Cooking spray or parchment paper for baking
Instructions
- Preheat your oven to 350°F (175°C). Line a baking sheet with parchment paper or lightly spray it with cooking spray.
- In a large mixing bowl, combine the ground sausage and shredded cheddar cheese. Mix together until evenly incorporated.
- Add the Bisquick baking mix, garlic powder, onion powder, and black pepper to the meat and cheese mixture.
- Pour in the milk and mix thoroughly with your hands or a sturdy spoon. The mixture should be moist, but not sticky. If it feels dry, add a touch more milk, one tablespoon at a time.
- Portion the mixture into 1-inch balls using a small cookie scoop or your hands. Place them about 1 inch apart on the prepared baking sheet.
- Bake in the preheated oven for 22 to 25 minutes, or until the sausage balls are golden brown on the outside and cooked through in the center.
- Remove from the oven and allow to cool slightly before serving. For party presentations, insert toothpicks into each sausage ball.
- Serve warm with your favorite dipping sauces or on their own. Store leftovers in an airtight container in the refrigerator and reheat as needed.
Nutritional Information
Bisquick Sausage Balls offer a rich, filling snack or appetizer, and understanding their nutritional profile can help you better fit them into your meal planning. Each serving (approximately 3 sausage balls) provides an average of 220 to 250 calories, depending on the specific type of sausage and cheese used.
The calorie content is mostly derived from protein-rich pork sausage and full-fat sharp cheddar cheese, making them a satisfying option that keeps you feeling fuller longer. These savory bites are also a significant source of protein, delivering roughly 9 to 11 grams per serving.
They contain moderate amounts of carbohydrates from the Bisquick mix, with around 8 to 10 grams per serving.
The fat content is higher, primarily from the cheese and sausage, so it is important to enjoy them in moderation if you're watching your fat intake—each serving contains about 16 to 18 grams of fat.
Additionally, sausage balls provide nutrients such as calcium (from cheese), iron, and some B vitamins due to the protein sources. However, they are also higher in sodium, coming in at approximately 400 to 470 mg per serving, so people following low-sodium diets should take this into account.
For those looking to make a lighter option, low-fat sausage and cheese alternatives can be substituted. With careful ingredient selection, Bisquick Sausage Balls can fit into a balanced diet as a flavorful treat.
Wine and Beverage Pairings
Bisquick Sausage Balls pair exceptionally well with a range of beverages depending on your occasion and preferences. For casual gatherings, a crisp, hoppy pale ale or a light lager complements the richness of the sausage and cheese.
If you prefer wine, opt for a Sauvignon Blanc or an unoaked Chardonnay—the citrus notes and acidity cut through the fattiness and enhance the cheddar flavors. For red wine enthusiasts, a fruity Pinot Noir or Grenache offers enough body and acidity without overpowering the appetizer.
As a non-alcoholic choice, serve with sparkling apple cider, spicy ginger ale, or even a savory tomato juice blend to balance the savory richness. At brunch, pair your sausage balls with fresh orange juice or an iced herbal tea for a refreshing and balanced experience.
Cooking Tips and Variations
For the most flavorful Bisquick Sausage Balls, use a freshly shredded block of sharp cheddar cheese rather than pre-shredded, which often contains anti-caking agents and can affect the texture and melt of your sausage balls. To add a little heat, opt for hot or spicy sausage instead of mild.
You can also experiment with different cheese varieties such as pepper jack, gouda, or Monterey jack to personalize the flavor profile. If the mixture feels too dry to roll, add more milk a tablespoon at a time until the dough is easily workable.
For those who want a lighter version, use turkey sausage and reduced-fat cheese, keeping in mind that the fat content helps them stay moist. Chilling the sausage mixture for about 30 minutes before forming the balls can make shaping easier and help the balls keep their form during baking.
For an even, golden crust, turn the balls once halfway through baking. If you're preparing for a larger party, the recipe can be easily doubled; leftovers also freeze well. To freeze, place formed but unbaked sausage balls on a tray until firm, then transfer to a freezer-safe bag.
Bake from frozen, adding a few minutes to the baking time. For a gluten-free variation, use a gluten-free baking mix instead of regular Bisquick. You can also add chopped fresh herbs, green onions, or a touch of hot sauce for unique twists.
Serve with mustard, barbecue sauce, ranch, or honey mustard for extra flavor.

Serving Suggestions
When serving Bisquick Sausage Balls, presentation and sauce pairings can elevate the appetizer to the next level. For parties, place the warm sausage balls on a large platter, garnished with chopped herbs like parsley or green onions to add a pop of color and freshness.
Insert decorative toothpicks for easy grab-and-go snacking, especially at buffets or potlucks. Offer a variety of dipping sauces to cater to both classic and adventurous palates—ranch dressing, honey mustard, spicy barbecue sauce, marinara, and a creamy sriracha mayo are all excellent accompaniments.
For brunches or breakfast gatherings, serve sausage balls alongside scrambled eggs, fruit salad, or a biscuit tray to create a well-rounded meal. They also work beautifully in a brunch board, paired with mini muffins, roasted potatoes, and a selection of fresh veggies.
Bisquick Sausage Balls are at their best when served warm; to keep them heated throughout a party, transfer the baked sausage balls to a slow cooker set on 'warm' or use a warming tray.
If you have leftovers, reheat them in the oven for a few minutes to restore their crispy exterior. Whether plated as an appetizer, enjoyed as a grab-and-go snack, or served as part of a breakfast feast, Bisquick Sausage Balls add a savory, satisfying touch to any occasion.
Health Benefits
Despite being indulgent, Bisquick Sausage Balls can be included in a balanced diet with thoughtful modifications. Using leaner turkey or chicken sausage significantly reduces saturated fat and calories while still providing the protein that supports muscle growth and satiety. Cheddar cheese supplies calcium, crucial for healthy bones and teeth.
Opting for reduced-fat cheese or a lower-fat baking mix can further lighten the recipe for calorie-conscious individuals. Additionally, the protein from the sausage and cheese makes these balls filling, helping to prevent overeating at parties or gatherings.
Serving with a platter of raw or roasted veggies or alongside fresh fruit boosts the fiber and nutrient content of your spread, making the overall meal more balanced. Those on gluten-free diets can enjoy this recipe by swapping in a gluten-free baking mix.
While Bisquick Sausage Balls are higher in sodium and fat, enjoying them occasionally and in moderation can allow you to savor their deliciousness without straying from your health goals.
Remember to always consider your specific nutritional needs; with smart substitutions, these savory bites can be a fun and tasty part of your recipe rotation.
Frequently Asked Questions
Yes, you can prepare and shape Bisquick Sausage Balls in advance. Store the unbaked balls covered in the refrigerator for up to 24 hours before baking, or freeze them and bake as needed.
Yes, any leftovers should be stored in an airtight container in the refrigerator for up to 4 days. Reheat in the oven or microwave before serving for best texture.
Raw sausage is recommended because it binds better with the Bisquick and cheese. If you use cooked sausage, the balls may not hold together as well, and the texture can be crumbly.
Traditional Bisquick contains gluten, but you can substitute a gluten-free baking mix to make gluten-free sausage balls.
Adding a little milk and using freshly shredded cheese ensures your Bisquick Sausage Balls stay moist. Avoid overbaking, which can dry them out.
Bisquick Sausage Balls combine savory sausage, melty cheese, and fluffy baking mix to create a snack that is sure to be a hit at any occasion. Their ease of preparation, adaptability to different tastes and dietary needs, and irresistible flavor make them a must-have at parties and family gatherings. Whether you’re serving them as an appetizer, a hearty snack, or a breakfast treat, Bisquick Sausage Balls promise satisfaction in every bite. Keep these helpful tips and variations in mind to customize your batch, and enjoy sharing this deliciously simple recipe with your loved ones. Bring a platter to your next event, and watch them disappear in no time!
Ingredients
- 2 cups Bisquick baking mix
- 1 pound uncooked ground pork sausage (mild or spicy)
- 1 ½ cups shredded sharp cheddar cheese
- ¼ cup milk
- ½ teaspoon garlic powder (optional)
- ½ teaspoon onion powder (optional)
- ¼ teaspoon black pepper
- Cooking spray or parchment paper for baking
Instructions
-
1Preheat your oven to 350°F (175°C). Line a baking sheet with parchment paper or lightly spray it with cooking spray.
-
2In a large mixing bowl, combine the ground sausage and shredded cheddar cheese. Mix together until evenly incorporated.
-
3Add the Bisquick baking mix, garlic powder, onion powder, and black pepper to the meat and cheese mixture.
-
4Pour in the milk and mix thoroughly with your hands or a sturdy spoon. The mixture should be moist, but not sticky. If it feels dry, add a touch more milk, one tablespoon at a time.
-
5Portion the mixture into 1-inch balls using a small cookie scoop or your hands. Place them about 1 inch apart on the prepared baking sheet.
-
6Bake in the preheated oven for 22 to 25 minutes, or until the sausage balls are golden brown on the outside and cooked through in the center.
-
7Remove from the oven and allow to cool slightly before serving. For party presentations, insert toothpicks into each sausage ball.
-
8Serve warm with your favorite dipping sauces or on their own. Store leftovers in an airtight container in the refrigerator and reheat as needed.
Approximate Information for One Serving
Nutrition Disclaimers
Number of total servings shown is approximate. Actual number of servings will depend on your preferred portion sizes.
Nutritional values shown are general guidelines and reflect information for 1 serving using the ingredients listed, not including any optional ingredients. Actual macros may vary slightly depending on specific brands and types of ingredients used.
To determine the weight of one serving, prepare the recipe as instructed. Weigh the finished recipe, then divide the weight of the finished recipe (not including the weight of the container the food is in) by the desired number of servings. Result will be the weight of one serving.
Did you make this recipe?
Please consider Pinning it!

Leave a Reply