
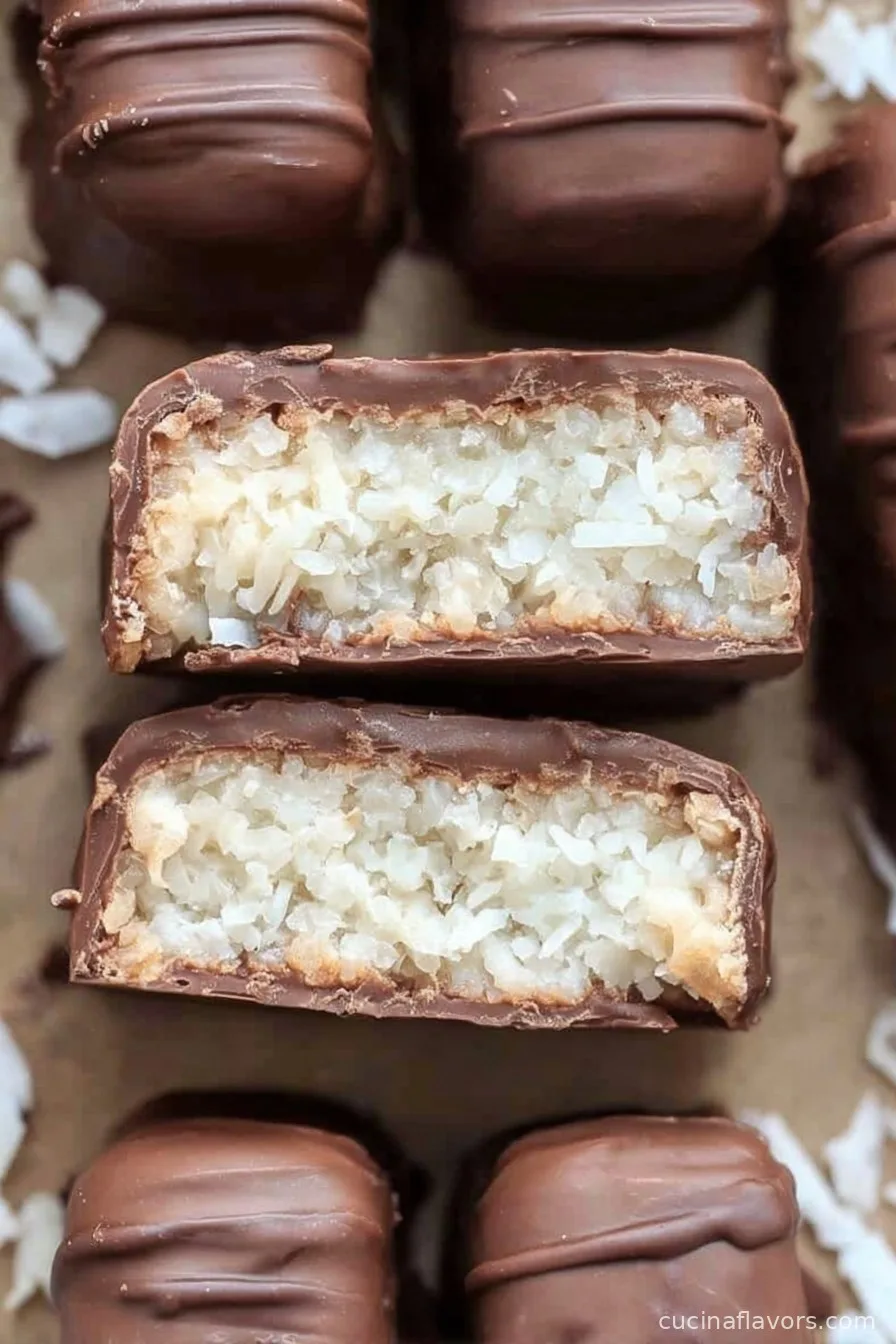
Indulge your sweet tooth with a classic treat that tastes even better homemade. Homemade Bounty Bars combine a luscious coconut filling with a smooth chocolate coating, making them the ultimate dessert for coconut fans.
Inspired by the famous coconut chocolate bar, this recipe lets you enjoy the taste of your favorite store-bought candy at home using simple pantry ingredients.
The original Bounty Bar was first launched by Mars, Incorporated in 1951, quickly becoming a beloved sweet treat worldwide due to its irresistible blend of smooth chocolate and moist, sweet coconut.
Today, these bars have become iconic, especially for those who crave the tropical duo of coconut and chocolate in every bite. Preparing homemade Bounty Bars gives you full control over the quality of ingredients while bringing a nostalgic taste straight to your kitchen.
The process is straightforward, making this recipe suitable for beginners and experienced bakers alike. Whether you're preparing them for a holiday party, an afternoon snack, or as a thoughtful homemade gift, these bars are sure to capture the hearts of all who try them.
Enjoy an authentic flavor profile, reminiscent of the classic Bounty Bar, while adding your own special touch. From their creamy coconut core to the decadent chocolate shell, each bite of these homemade bars delivers rich, sweet flavor and satisfying texture.
Perfect as a treat for yourself or to share with loved ones, Homemade Bounty Bars are a reliable favorite that celebrates the simple joys of classic confectionery. Get ready to discover just how easy – and delicious – making your own coconut chocolate bars can be.
Ingredients
- 3 cups shredded coconut
- ½ cup powdered sugar
- ⅔ cup coconut condensed milk or standard condensed milk
- 1-2 cups chocolate, chopped
Instructions
- Start by taking a large mixing bowl and combining the shredded coconut with the powdered sugar, stirring thoroughly until both ingredients are completely integrated. Make sure there are no lumps in the powdered sugar for the smoothest texture.
- Pour in the coconut condensed milk (or standard condensed milk) and blend it with the dry mixture until you achieve a dense, cohesive coconut batter. The mixture should stick together when pressed and have a thick, sticky consistency that is easy to mold.
- Dampen your hands lightly with water to prevent the coconut mixture from sticking. Portion out the coconut filling and shape it into small logs approximately 4 inches in length. Arrange each bar on a baking sheet or plate lined with parchment paper to avoid sticking.
- Transfer the shaped coconut bars to the freezer and allow them to chill for about 10 minutes. This step helps the bars firm up, making them easier to coat with melted chocolate later.
- Meanwhile, melt the chopped chocolate in a microwave-safe bowl or using a double boiler. Heat in short intervals, stirring frequently, until the chocolate is smooth and fully melted. Let the chocolate cool slightly but remain fluid for dipping.
- Take the coconut bars out of the freezer. Using two forks, carefully dip each bar into the melted chocolate, turning it to ensure every side is evenly covered. Allow excess chocolate to drip off before returning the coated bar to the lined plate.
- After all the bars are coated, place them in the refrigerator to set. Chill until the chocolate has solidified completely, which typically takes about 30 minutes. Once set, your Homemade Bounty Bars are ready to enjoy!
Nutritional Information
Homemade Bounty Bars are a delightful indulgence, and understanding their nutritional profile helps you make informed dietary choices. Each bar primarily consists of coconut, chocolate, and sweetened condensed milk, which means they are moderately high in calories and sugar content—a typical treat for those with a sweet tooth.
Coconut is naturally rich in dietary fiber and healthy fats, particularly medium-chain triglycerides (MCTs), which may support energy and metabolism. However, because shredded coconut and condensed milk both have a considerable fat content and powdered sugar increases the carbohydrate load, these bars are best enjoyed in moderation.
Each serving can contain roughly 200 to 250 calories, depending on the size of your bars and the type of chocolate used, with the majority of those calories coming from the fats and sugars.
Homemade Bounty Bars contain minimal protein and varying amounts of saturated fat, particularly when using full-fat condensed milk and conventional chocolate. While they are not considered a health food, their minimal use of preservatives and artificial flavorings makes them a more natural option compared to many store-bought confections.
Always consider adjusting portion sizes based on your dietary goals, and feel free to use dark chocolate for a slightly lower sugar content.
Wine and Beverage Pairings
Homemade Bounty Bars pair beautifully with a range of beverages that complement their coconut and chocolate elements. For an indulgent treat, try serving these bars alongside a robust cup of coffee or an espresso—the bold flavors balance the sweetness of the coconut center and the richness of the chocolate.
Hot chocolate or café mochas also make excellent partners, especially for a cozy dessert experience. If you prefer tea, consider pairing them with a mildly astringent black tea, like Darjeeling or Earl Grey, which can cut through the bars' sweetness.
For those who enjoy wine with dessert, opt for a sweet dessert wine such as a late-harvest Riesling, Tawny Port, or Muscat; their fruit-forward profiles accentuate the coconut's natural sweetness while harmonizing with the chocolate.
You can also try pairing Homemade Bounty Bars with a coconut-infused cocktail, like a piña colada, for a tropical twist. For non-alcoholic options, coconut milk or a vanilla almond milk shake complements the bars’ flavors and adds a refreshing finish.
Cooking Tips and Variations
Perfecting your Homemade Bounty Bars comes down to mastering the texture and flavor balance. Here are some valuable tips and creative variations to enhance your recipe experience.
First, always use high-quality shredded coconut for the best flavor and texture—desiccated coconut can be too dry, so if you use it, add a touch more condensed milk for moistness.
When mixing the ingredients, check that the coconut filling holds its shape when pressed; if it's too crumbly, drizzle in an extra tablespoon of condensed milk until the mixture binds easily.
When it comes to shaping, keep your hands moist to form neat, compact logs—this helps prevent sticking and ensures uniform bars. Freezing the filling is essential; it allows for easy dipping and prevents bars from melting or falling apart when they hit the warm chocolate.
For a classic milk chocolate coating, opt for a smooth, high-cocoa chocolate, but you can also use dark chocolate for a richer, less sweet finish or white chocolate for a playful twist.
If you want to experiment, try adding a hint of vanilla extract to the coconut mix or sprinkling a pinch of sea salt over the chocolate before it sets for an elevated flavor profile. For those desiring a vegan version, use plant-based condensed milk and dairy-free chocolate.
Want to go bite-sized? Form small round balls or squares for a fun, poppable treat perfect for parties. Whatever your choice, making Bounty Bars at home grants you endless customization opportunities to suit your taste.

Serving Suggestions
For a memorable dessert presentation, consider serving Homemade Bounty Bars chilled or at room temperature on a platter lined with parchment or decorative tissue paper. If you’re making them for an event, arrange the bars in neat rows or stack them in a pyramid for visual appeal.
Garnish with a sprinkle of shredded coconut over the top of the bars just before serving to reinforce the coconut theme and add a touch of texture.
For a festive occasion or party, you can cut the bars into smaller bite-sized pieces and insert decorative toothpicks for easy handling—perfect for buffet-style or dessert tables.
These bars are also ideal for homemade gift boxes; place them in mini cupcake liners and wrap them in a fancy box for a thoughtful, homemade treat to share during holidays or special events.
Homemade Bounty Bars can also be served alongside other homemade candies such as fudge or truffles to create a delightful dessert platter. For a modern twist, drizzle melted white or dark chocolate over the set bars in a zigzag pattern for an elegant finish.
No matter how you present them, these coconut chocolate bars are a surefire crowd-pleaser and guaranteed to be a highlight of any sweet spread.
Health Benefits
While Homemade Bounty Bars are designed as an indulgent treat, there are some notable health elements thanks to their coconut content. Coconut provides dietary fiber, which benefits digestive health and contributes to a sense of fullness.
The medium-chain triglycerides (MCTs) found in coconut fat are metabolized differently from other fats and may help with energy production and potentially aid in weight management when consumed in moderation.
The use of chocolate, especially dark chocolate, brings antioxidants such as flavonoids, which can promote cardiovascular health by supporting blood vessel function.
Making these bars at home also allows you to avoid the artificial flavors and excess preservatives often found in commercial bars; you can even control the sugar level by adjusting the amount of powdered sugar or choosing a less sweet chocolate.
For those with dairy intolerances or specific dietary needs, using coconut condensed milk and dairy-free chocolate creates a vegan-friendly option. However, given their sugar and calorie content, it is important to enjoy these treats mindfully as part of a balanced diet.
Frequently Asked Questions
Keep Homemade Bounty Bars in an airtight container in the refrigerator for up to two weeks. They can also be frozen for longer storage; simply thaw in the fridge before serving.
Yes, replace standard condensed milk with coconut condensed milk and use dairy-free chocolate to create a fully vegan version of Homemade Bounty Bars.
If too dry, add a small amount of extra condensed milk until the mixture binds easily. If too wet, gently add more shredded coconut to achieve the desired texture.
You can use milk, dark, or even white chocolate. For a classic Bounty Bar flavor, stick to milk chocolate, but dark chocolate creates a richer taste and is less sweet.
Yes, this recipe is naturally nut-free, provided your chocolate and other ingredients are processed in nut-free facilities if cross-contamination is a concern.
Homemade Bounty Bars are a beautiful blend of simplicity and indulgence that allow you to recreate a classic store-bought favorite in your own kitchen. With just a few ingredients, you produce a deliciously rich coconut filling encased in luscious chocolate, perfectly balancing flavor and texture. Their homemade origins mean you can trust the quality of what you’re serving, tailor them to dietary preferences, and share a nostalgic treat with family and friends. Whether enjoyed as an afternoon snack, gifted to loved ones, or featured at your next gathering, Homemade Bounty Bars bring a touch of sweetness and satisfaction. Try making these bars today and embrace the joy of homemade coconut chocolate bars.
Ingredients
- 3 cups shredded coconut
- ½ cup powdered sugar
- ⅔ cup coconut condensed milk or standard condensed milk
- 1-2 cups chocolate, chopped
Instructions
-
1Start by taking a large mixing bowl and combining the shredded coconut with the powdered sugar, stirring thoroughly until both ingredients are completely integrated. Make sure there are no lumps in the powdered sugar for the smoothest texture.
-
2Pour in the coconut condensed milk (or standard condensed milk) and blend it with the dry mixture until you achieve a dense, cohesive coconut batter. The mixture should stick together when pressed and have a thick, sticky consistency that is easy to mold.
-
3Dampen your hands lightly with water to prevent the coconut mixture from sticking. Portion out the coconut filling and shape it into small logs approximately 4 inches in length. Arrange each bar on a baking sheet or plate lined with parchment paper to avoid sticking.
-
4Transfer the shaped coconut bars to the freezer and allow them to chill for about 10 minutes. This step helps the bars firm up, making them easier to coat with melted chocolate later.
-
5Meanwhile, melt the chopped chocolate in a microwave-safe bowl or using a double boiler. Heat in short intervals, stirring frequently, until the chocolate is smooth and fully melted. Let the chocolate cool slightly but remain fluid for dipping.
-
6Take the coconut bars out of the freezer. Using two forks, carefully dip each bar into the melted chocolate, turning it to ensure every side is evenly covered. Allow excess chocolate to drip off before returning the coated bar to the lined plate.
-
7After all the bars are coated, place them in the refrigerator to set. Chill until the chocolate has solidified completely, which typically takes about 30 minutes. Once set, your Homemade Bounty Bars are ready to enjoy!
Approximate Information for One Serving
Nutrition Disclaimers
Number of total servings shown is approximate. Actual number of servings will depend on your preferred portion sizes.
Nutritional values shown are general guidelines and reflect information for 1 serving using the ingredients listed, not including any optional ingredients. Actual macros may vary slightly depending on specific brands and types of ingredients used.
To determine the weight of one serving, prepare the recipe as instructed. Weigh the finished recipe, then divide the weight of the finished recipe (not including the weight of the container the food is in) by the desired number of servings. Result will be the weight of one serving.
Did you make this recipe?
Please consider Pinning it!

Leave a Reply