
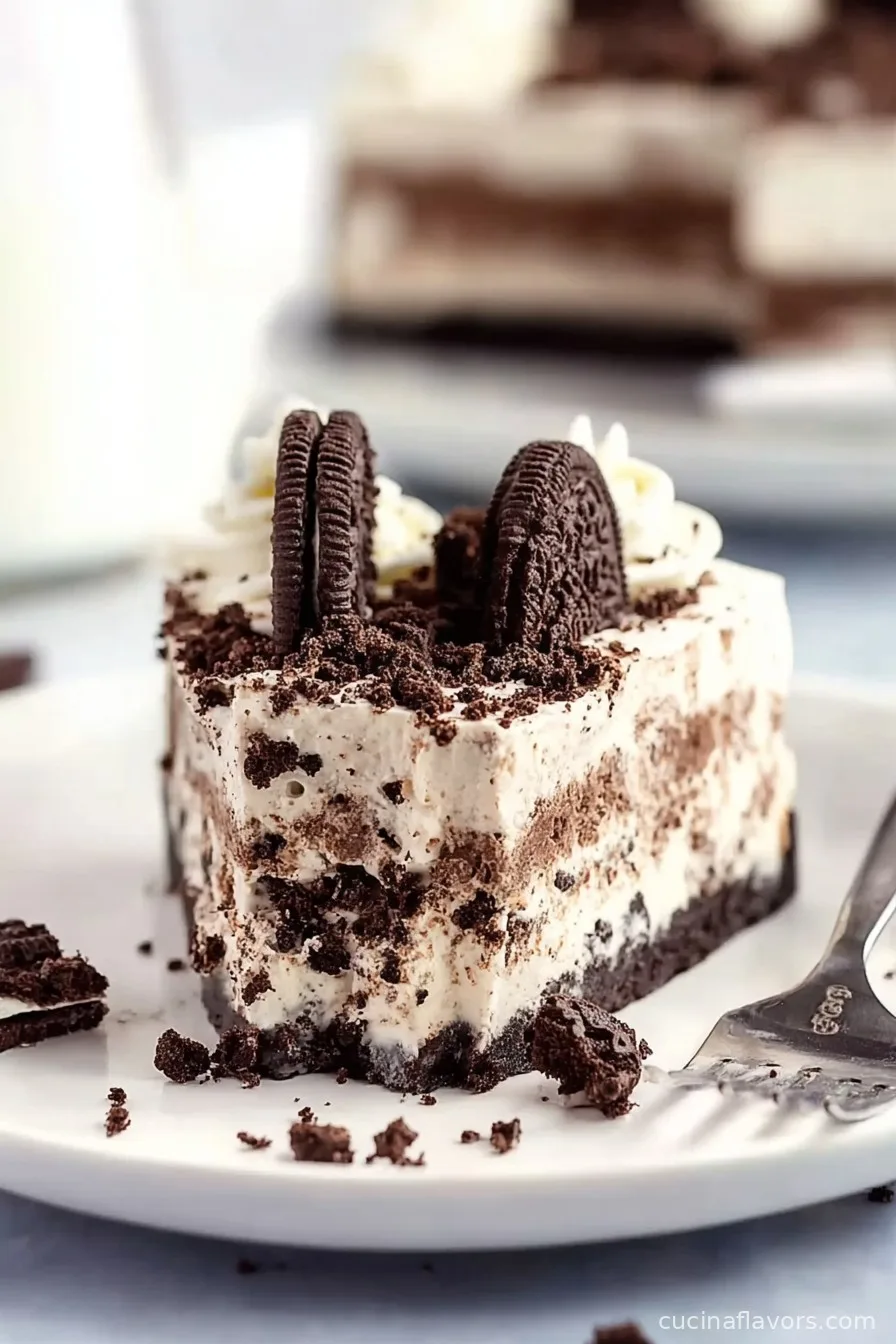
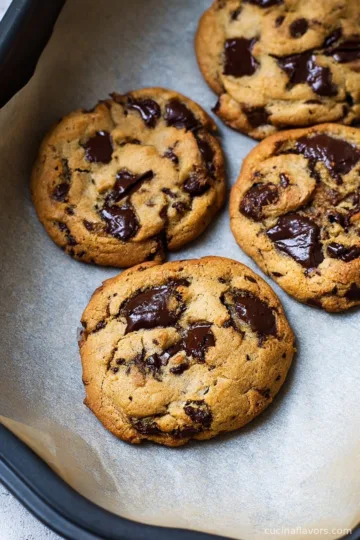
No Bake Oreo Cheesecake is a beloved dessert that brings together the rich, chocolatey flavor of Oreos with a creamy cheesecake filling. This delightful treat is an irresistible fusion of two classics – Oreo cookies and cheesecake – all without even turning on your oven.
The no bake concept appeals to busy home bakers and dessert enthusiasts alike, offering an easy yet indulgent option for any season. The origin of no bake cheesecakes dates back to a time when bakers sought fast, fuss-free alternatives to traditional baked cheesecakes.
With the rise of convenience foods and the popularity of cream cheese desserts in the mid-20th century, no bake cheesecakes quickly gained fame. By incorporating iconic Oreo cookies into the mix, this recipe creates a crowd-pleasing, visually stunning cake that’s perfect for holidays, birthdays, and spontaneous celebrations.
Popular among families, kids, and anyone with a sweet tooth, the No Bake Oreo Cheesecake stands out for its luscious texture, recognizable Oreo crunch, and the irresistible appeal of its cookies-and-cream flavor.
Whether you’re an experienced baker or a beginner looking for a hassle-free dessert, this no bake cheesecake recipe offers a simple way to enjoy a truly decadent Oreo-themed creation.
Ingredients
- 24 Oreo cookies (for the crust)
- ¼ cup unsalted butter, melted
- 16 ounces (2 cups) cream cheese, softened
- 1 cup powdered sugar
- 2 cups heavy whipping cream (chilled)
- 12 Oreo cookies (roughly chopped, for filling)
- 1 teaspoon vanilla extract
- 8 Oreo cookies (for decoration/topping, optional)
- Whipped cream, for garnish (optional)
Instructions
- Crush 24 Oreo cookies in a food processor or place them in a sealed bag and crush with a rolling pin until they form fine crumbs.
- Combine the Oreo crumbs with melted butter in a mixing bowl, stirring until the mixture resembles wet sand.
- Press the crumb mixture evenly into the bottom of a 9-inch springform pan to form the crust. Use the back of a spoon or a flat-bottomed glass to compact it firmly. Refrigerate for at least 30 minutes to set.
- In a large mixing bowl, beat the softened cream cheese with powdered sugar and vanilla extract until smooth and creamy.
- In a separate chilled bowl, whip the heavy cream until stiff peaks form, being careful not to overwhip.
- Gently fold the whipped cream into the cream cheese mixture until smooth and fully combined. Avoid deflating the mixture.
- Fold in the roughly chopped Oreo cookies to distribute them throughout the cheesecake filling.
- Pour the filling onto the chilled crust and smooth the top with a spatula.
- Refrigerate the cheesecake for at least 6 hours, or preferably overnight, until it is firmly set.
- Before serving, decorate the top with extra Oreos and dollops of whipped cream, if desired. Carefully release the springform pan and serve.
Nutritional Information
No Bake Oreo Cheesecake is a rich dessert, notable for its creamy texture and sweet flavor profile. On average, one slice (based on 12 servings) contains approximately 410-450 calories, making it a decadent treat ideal for special occasions.
Each serving provides about 5-7 grams of protein, thanks to the cream cheese and whipped cream components, while carbohydrates usually fall in the 33-38 gram range, predominantly from the Oreo cookies and sugar.
Due to the cream cheese, butter, and heavy whipping cream, the cheesecake also contains around 31-35 grams of fat per serving, with a notable portion being saturated fat. While it is lower in sodium compared to store-bought versions, each slice still contains some sodium from the cookies and dairy products.
The recipe is naturally free from artificial preservatives. For those with dietary concerns, it is possible to reduce sugar by choosing lower-sugar versions of the cookies or using alternative sweeteners.
While this cheesecake is undeniably indulgent, it does serve as a valuable source of calcium and a modest amount of vitamin A. If you are watching your calories or fat intake, consider serving smaller portions.
For a lighter version, swap full-fat dairy for reduced-fat alternatives, though this may alter the dessert's classic creamy mouthfeel.
Wine and Beverage Pairings
No Bake Oreo Cheesecake pairs beautifully with a variety of beverages. For a classic touch, serve it with freshly brewed coffee or rich espresso, as the bold flavors balance the sweet, creamy notes of the cheesecake.
Milk, whether whole or plant-based, is always a reliable choice that complements the chocolate and cream flavors. For a more sophisticated pairing, try serving the dessert with a glass of semi-sweet dessert wine, such as Moscato d’Asti, which offers gentle floral and fruity notes.
Chocolate stout or porter beers provide a unique harmony with the Oreo base, and for non-alcoholic options, a vanilla or chocolate milkshake makes an indulgent partner. On warm days, an iced latte or cold brew coffee also works wonderfully with the cheesecake’s rich texture.
Cooking Tips and Variations
For the perfect No Bake Oreo Cheesecake, it's essential to start with high-quality, full-fat cream cheese, as this will ensure your cheesecake is smooth, tangy, and rich in flavor.
Be sure to let your cream cheese sit at room temperature before mixing, as this prevents lumps and creates a creamier filling. When whipping the heavy cream, keep the bowl and beaters cold for best volume and texture; soft peaks will result in a lighter, fluffier cheesecake.
For an ultra-fine crust, use a food processor to crush the Oreos, and compact the crust firmly with a glass or measuring cup to avoid crumbling when slicing.
To further customize your no bake cheesecake, consider boosting the chocolate flavor by adding mini chocolate chips to the filling or using flavored Oreos, like mint or peanut butter, for a twist. Swap out regular Oreos for gluten-free versions to accommodate dietary restrictions.
For a visually stunning presentation, layer the filling with additional crushed Oreos or drizzle with chocolate ganache before serving. If time is short, chill the cheesecake in the freezer for up to 2 hours, though a slower-set in the fridge creates a silkier texture.
Experiment with flavor add-ins like instant coffee, citrus zest, or even a swirl of caramel for unique variations. Remember, patience pays off: allowing the cheesecake to fully set overnight guarantees perfect, clean slices every time.

Serving Suggestions
When it comes to serving No Bake Oreo Cheesecake, presentation and portioning play important roles in maximizing enjoyment. Always use a sharp, thin-bladed knife dipped in hot water for slicing to ensure clean, neat edges – simply wipe the blade between cuts for the most polished result.
A classic touch is to decorate the top of the cheesecake just before serving: arrange whole Oreos or halves in a decorative pattern, pipe or dollop freshly whipped cream around the edges, and sprinkle on additional crushed cookies for visual interest and extra crunch.
Serve each slice chilled straight from the refrigerator for the best texture; the cheesecake should be firm yet creamy. For special occasions, consider personalizing each slice with a drizzle of chocolate syrup, a handful of fresh berries, or even a sprig of mint for color contrast.
Elevate parties or family gatherings by preparing the cheesecake in individual mini jars or cups for stylish single servings. If you have leftovers, store them tightly covered in the refrigerator for up to 3-4 days.
The cheesecake also freezes well; wrap slices in plastic wrap and freeze for up to one month, thawing overnight in the fridge before serving.
Pair with your chosen beverage and enjoy as a show-stopping dessert centerpiece or a midnight snack – however you serve it, each bite promises classic Oreo goodness in creamy cheesecake form.
Health Benefits
Though No Bake Oreo Cheesecake is largely an indulgence, it does offer some redeeming qualities. Cream cheese is a good source of protein and calcium, essential for bone and muscle health. The dessert also contains a modest amount of vitamin A and healthy fats that can contribute to satiety.
If you modify the recipe by using reduced-fat dairy and less sugar, it can fit into a balanced diet as an occasional treat. Oreo cookies provide carbohydrates for energy, though they should be consumed in moderation due to their sugar content.
This cheesecake contains no artificial flavorings or preservatives when made at home, making it a preferable option to store-bought desserts laced with additives. For those who are lactose sensitive, lactose-free cream cheese and non-dairy whipping cream can often be substituted, making this dessert more inclusive.
While not a low-calorie or health food per se, No Bake Oreo Cheesecake can be enjoyed mindfully as a part of a diverse, overall healthy eating plan, especially when you monitor portion size and balance treats with plenty of fruits, vegetables, and lean proteins throughout your week.
Frequently Asked Questions
Yes, No Bake Oreo Cheesecake is an excellent make-ahead dessert. Prepare it up to 2 days in advance and keep it covered in the refrigerator until you are ready to serve.
Yes, you can substitute low-fat cream cheese, but the texture may be less creamy and the flavor less rich. Full-fat cream cheese is recommended for best results.
Be sure to use enough melted butter to bind the Oreo crumbs, and press the mixture firmly into the pan. Chilling the crust for at least 30 minutes helps it set properly.
Yes, you can freeze the cheesecake for up to one month. Wrap slices tightly in plastic wrap and thaw overnight in the refrigerator before serving.
Yes, No Bake Oreo Cheesecake is suitable for vegetarians as it contains no gelatin or animal-based thickeners. Double-check your Oreo package to ensure it fits your dietary preferences.
No Bake Oreo Cheesecake is the ultimate dessert for anyone who loves the classic combination of chocolate cookies and luscious, creamy cheesecake. This no bake recipe is incredibly simple, requiring minimal tools and no oven time, making it perfect for novice bakers and expert hosts alike. Whether you are marking a special event or seeking a show-stopping weekend treat, this cheesecake impresses with its flavor, texture, and beautiful presentation. Flexible enough for creative variations and adaptable to dietary needs, the No Bake Oreo Cheesecake is sure to become a family favorite. Enjoy each creamy, decadent bite – and don’t forget to share this delicious, easy-to-make dessert with friends and loved ones.
Ingredients
- 24 Oreo cookies (for the crust)
- ¼ cup unsalted butter, melted
- 16 ounces (2 cups) cream cheese, softened
- 1 cup powdered sugar
- 2 cups heavy whipping cream (chilled)
- 12 Oreo cookies (roughly chopped, for filling)
- 1 teaspoon vanilla extract
- 8 Oreo cookies (for decoration/topping, optional)
- Whipped cream, for garnish (optional)
Instructions
-
1Crush 24 Oreo cookies in a food processor or place them in a sealed bag and crush with a rolling pin until they form fine crumbs.
-
2Combine the Oreo crumbs with melted butter in a mixing bowl, stirring until the mixture resembles wet sand.
-
3Press the crumb mixture evenly into the bottom of a 9-inch springform pan to form the crust. Use the back of a spoon or a flat-bottomed glass to compact it firmly. Refrigerate for at least 30 minutes to set.
-
4In a large mixing bowl, beat the softened cream cheese with powdered sugar and vanilla extract until smooth and creamy.
-
5In a separate chilled bowl, whip the heavy cream until stiff peaks form, being careful not to overwhip.
-
6Gently fold the whipped cream into the cream cheese mixture until smooth and fully combined. Avoid deflating the mixture.
-
7Fold in the roughly chopped Oreo cookies to distribute them throughout the cheesecake filling.
-
8Pour the filling onto the chilled crust and smooth the top with a spatula.
-
9Refrigerate the cheesecake for at least 6 hours, or preferably overnight, until it is firmly set.
-
10Before serving, decorate the top with extra Oreos and dollops of whipped cream, if desired. Carefully release the springform pan and serve.
Approximate Information for One Serving
Nutrition Disclaimers
Number of total servings shown is approximate. Actual number of servings will depend on your preferred portion sizes.
Nutritional values shown are general guidelines and reflect information for 1 serving using the ingredients listed, not including any optional ingredients. Actual macros may vary slightly depending on specific brands and types of ingredients used.
To determine the weight of one serving, prepare the recipe as instructed. Weigh the finished recipe, then divide the weight of the finished recipe (not including the weight of the container the food is in) by the desired number of servings. Result will be the weight of one serving.
Did you make this recipe?
Please consider Pinning it!
Leave a Reply